Day 2 – Hips & Glutes
The foundation of a strong, injury‑free lower‑body
Beginner
Hey guys it’s Dean, welcome to Man Flow Yoga. This is your second free lesson from Man Flow Yoga. Today’s lesson is hips hip and glutes strength so I’m going to talk about why hip strength is so important, why most of us have issues with hip strength and then give you the best exercises for improving your hip strength finally at the end of that I’m going to give you a plan moving forward so that you can continue to work on your hip strength even after the lesson is done. So why do most of us have issues with hip strength and why is hip strength so important? Hip strength is important because without strong hips we are at risk in our lower body for injury strong hips are the foundation of a strong lower body, so if we don’t have those our knees, our ankles, our lower back our hips. Those are all at risk for a for injury we also can’t perform as well so without proper hip strength. The load of our body shifts into our knees so instead of using all these big muscles we have right around the hips, the hip flexors, the glutes, the adductor is the abductors we’re using just the muscles that connect to the knees and that’s leaving out so much, so we’re having very big inefficiencies as a result of not using our hips. So let’s talk about why most of us have hip issues or at least hip lack of hip strength issues, which really manifest in other issues so most of us have these issues because of inactivity again there’s that in activity factor coming back just like that lack of course strength, the the lack of activity is also responsible for a lack of hip strength, so when we are sitting our muscles are turning to mush, we’re not using our glutes, we’re not using our hip flexors, we’re not using the muscles in our hips so when we go to exercise and we’ve been sitting all day and these muscles have all been inactive those muscles don’t know what to do, they don’t know how to turn on, they’re not moving from off to on and we’re doing a workout entirely with the muscles down here in the lower part of our thighs instead of using all these bigger muscles in the upper part of the thighs, in the hips so sitting is a huge factor involved in the lack of hip strength but I also want to talk about why yoga is such a great solution for this so unlike other forms of exercise yoga is slow moving, it sometimes it’s just isometrics, we’re not even moving at all and what that does is it helps you to develop muscular and body awareness, so instead of sitting and then moving straight into a workout and moving quickly right maybe doing some squats and not really knowing whether or not those hip muscles are turned on we’re doing a slow movement, we’re doing a slow controlled maybe even an isometric movement so a nonmoving exercise that helps you develop muscular awareness that helps move that muscle from the offsetting to on so that in addition to the activation aspect of these exercises we’re also building strength so we’re getting those muscles turned on, we’re building muscle awareness and then we’re strengthening these muscles. So this is what’s so cool about yoga and why it’s going to help with improving your hip strength whether your goal is just to not have back pain, to strengthen your knees, to recover from an injury or if your goal is more athletic, more performance driven, more hip strength means a more efficient body and means more injury prevention so that when you do encounter situations on let’s say it’s on a trail or maybe it’s on the field, your knees and your ankles are at less risk for injury so that’s the explanation that’s why hip strength so important that’s why most of us have issues with hip strength even if we don’t know it and that’s why yoga is so well suited to helping hip strength.
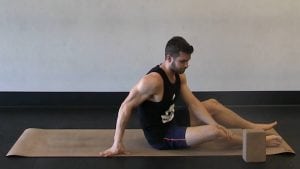
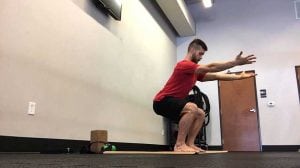
So let’s get into these exercises, now this is the beginner version so this is level one so you might want to try this and if it’s too easy move on to the intermediate or the advanced but I’ve got three exercises to show you today. The first exercise is a seated hip hip flexor exercise called a seated march hold, this is level one. The next exercise is a lunge, a low lunge with the knee on the ground. The next exercise and the final exercise that I’ll show you is an assisted chair pose, we are going to be using something to hold onto to help you get into a proper chair pose. So that first exercise seated march old, find a chair so I’ve got one here and you are going to sit in the chair nice an upright, sitting up nice and tall with good posture and your feet should be able to touch the ground so if you’re sitting down your feet are hovering way off the ground you need a shorter chair or you can put something under your feet like this just a block for example. So all I’m going to do here my feet are about my knees my feet about hip with distant I’m just going to lift one knee off the ground or sorry, one knee up in the air, I want to stay sitting upright here so I’m just going with my left knee up and then press my hand to my thigh and this is going to immediately turn on my hip flexor, this muscle in the top of the top and outside of my thigh, your hip flexors connect your legs to your torso then these muscles typically turn to mush while you’re sitting kind of like I mentioned before with that whole muscles turning to mush thing because of sitting this is one of those muscles so going to push the hand the thigh sit up nice and tall and are working on building muscle awareness through through the head flex or and also the longer we hold this building strength even building muscle mass in the hip flexor. So we’re the both sides so now the right lay comes up and pushing my hand to my thigh I want to make sure not to collapse like this and so I’m not letting my back fall against the chair this is still going to exercise a hip flexor even if I do have poor posture. But let’s just get into the habit of having good posture and working on hip strength in that position so to do this exercise you’re going to hold it for about thirty seconds maybe forty five maybe sixty seconds and then I already pressed into that thigh with your hand and resist with your thigh, because the hands pushing down, the thighs pushing up the more intensity, the more activity you’re going to get out of the hip flexor. So there’s your first exercise the seated march hold again that’s for your hip flexors.
Second exercise we are going to be doing is a lunge, so just a low lunge which means which means knee on the ground. Which means back knee on the ground so you have the back knee down just like this, I would have the knee over the ankle in the front foot and I want to have my hips facing straight forward, you know let me turn so you can see this so I’m going to have my hips facing straight forward, bring your hands to your hips, make sure that they are squared toward the front and then we’re going to push down through this right foot so really drive the heel down, drive your toes into the ground and squeeze your right glutes, squeeze this whole right thigh from the back of the knee all the way to your butt and this is going to turn on your glutes, right so we talked about how before when you’re sitting here muscles are an active we need to spend time in this isometric in this nonmoving position in order to get that muscle from the off to on setting, so this is a great exercise just for getting that muscle to turn on or to help build strength, so maybe if we are let’s say we’re a runner and we want to make sure that our glutes are turned on for the exercise for the run ahead this is great for that at the same time maybe our goals are less than that maybe our goal is a more modest and we just want to have hip strength or this is the exercise for the day, this is great for that as well because we’re developing hips strength, we’re developing muscle in our glutes at the same time we are also stretching the opposite hip, so my left hip the back up here is stretching the hip flexor that muscle that we just engaged that we just flexed for the seated march hold, squeeze the legs in opposite directions and that’s going to help turn on the inner thighs, so my right heel squeezes back, my left knee squeezes forward, I’m pushing down hard on my foot and I’m lifting my chest up so that’s going to get a deeper stretch through here the harder I push down through the foot I’m going to get a better stretch through, sorry a better engagement through my glute. So that is exercise number two let’s switch sides make sure you get it and I’ll walk through that again one more time. So this is a lunge and again it’s a basic exercise most of us have done a lunge but I want you to treat this with extreme attention and detail. So we start off knee over the ankle in the front foot, pressing down hard through the toes through the heel through the foot, we actually want to have the arch of the foot lifted so I’m not pressing down the arch of my foot keeping that lifted, now I’m going to squeeze my legs toward one another so the left heel pulls back, the right knee squeezes forward to create that scissoring motion or that scissoring effect which helps to engage my inner thighs, that helps with knee stability, that also helps with core strength and reducing back pain. So I’m pushing down the foot, I’m squeezing the knee forward, I’m squeezing the front foot back and now I’m pulling my ribs up and getting up right through my chest, so I’ve got lots of engagement through my left thigh through the left hip to the glute and I’ve also got to stretch through the front of my right hip and this is the low lunge. So for this exercise you’re going to hold this for thirty seconds to start if you find that difficult but I want you to work up to doing ninety seconds and you don’t have to do two sets of these I would just do one and hold it for thirty, forty-five, sixty and then maybe up to ninety seconds so. Just do this on both sides once, maybe twice per day it’s really good to do this twice per day and I recommend doing it in the morning and then in the evening and that helps with hip strength but also with that hip mobility in the front of the hip.
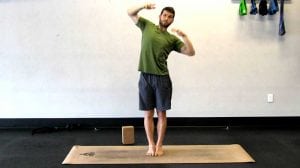
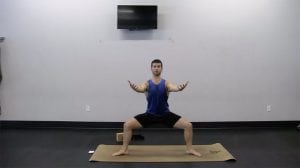
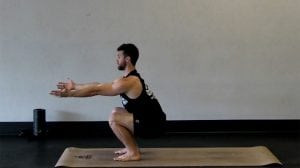
All right moving on to exercise number three, this is a chair post and for this one I’m going to have you use some sort of support so I have a squat rack here you don’t need a squat rack all you need is a wall, a banister, maybe even a railing for this and the goal of the chair pose is to get your glutes engaged so for this you’re going to hold on to whatever your support is, you’re going to bring your toes together so my toes are touching, my heels about an inch apart and I’m going to bend my knees slightly forward, push my butt way back way back, way back, way back and then hold on to whatever the support is. Now I want to squeeze my thighs toward one another so I’m going to pretend like I’m holding a really small ball between my thighs and I want to squeeze and pinch that ball and then get my hips down, push them back maybe keep the knees slightly forward not to the point where they’re going over the toes maybe just a little bit in front of the ankles and then lifting my chest up. Now my goal here is glute activation so you really want to squeeze your butt get those muscles turned on and then keeping the thighs squeezing toward one another so you’re also developing strength through the inner thighs which is going to help with knee stabilization again with the core strength and with overall hip strength so this is level one, now when you get confident here this is when you start to move your hands away from the support right and make your arms go up like this and this is level two but again we’re just starting off with holding on and working on sitting down lower into this and getting those glutes to really turn on. So this is something that you can do with say two reps of those, start at thirty seconds and work your way up to sixty seconds so we’re going to got three exercises, we’ve got the seated march hold on the chair, we have the low lunge with the need down on the ground and then we have the chair pose holding on to extra support and again most these exercises thirty, sixty, ninety seconds one to two sets of each.
So below here I’ve listed some workouts that build on what we’ve just discussed that help with building hip strength and help with even building hip mobility and getting hip strength and even full body movements like squats and lunges. So if you like this lesson, if you want to keep going, I’ve listed those lessons below so that you can continue to learn continue to get stronger the way that you access those lessons is through the members area and so for one dollar you get a seven day trial that gets you on limited access to all of our content, the work of programs, tutorials, diet nutrition and us so much more but we’ve got a few more lessons left before you need to sign up for that so I’m going to keep the lessons. I hope you enjoyed today’s lesson, this was hip and glute strength if you enjoyed it share it with a friend post about it on Facebook, post it on Instagram, Twitter, Snap Chat, whatever it is you like to use I would appreciate that also get your friends involved, we all need hip strength. So thanks again for joining me, thanks for giving yourself the time to work on your body, to work on your fitness. I look forward to seeing you tomorrow for the next lesson, hip mobility.
Intermediate

Hey guys, my name is Dean. Welcome to Man Flow Yoga. Welcome to the second lesson of your free into to Man Flow Yoga. Today’s lesson is hips, hip and glute strength. So in this lesson I’m going to go through a few things, number one I’m going to talk about why is hip strength so important, why should you care. Number two I’m going to talk about why most of us have issues or lack of hip strength and even if you don’t know what those issues can result in I’ll go into why it’s important even if you don’t notice it. Number three I’m going to give you the best exercises for working on your hip strength and of course I’m going to give you a plan for those exercises moving forward so that you can continue to strengthen your hips. All right let’s get into it, why is that strength important? The hips are the foundation of a strong lower body if you don’t have strong hips you’re at a higher risk of injury for your knees, your ankles, and your back. I’m speaking from experience so as an athlete I had need a knee and ankle injuries for most of my life and I realized very late in life later on at least after all high school and college sports we’re done and it was because of a lack of hip strength. So my goal in teaching you this hip strength exercises is for you to take care of your body, for you to be able to do what you want to do, and to continue to get stronger and pursue your physical fitness interest, whether that’s athletic performance or if it’s just being able to move around the house without pain. So that’s why hip strength is so important. Number two, why do most of us have a lack of hip strength? Most of us lack hip strength because of inactivity, we sit and as a result of that when we go into our workouts our hips are still not active, the hips have been sitting in mush all day they have been totally inactive, they’re totally turned off and we go into our workout and they’re still off, so we go into our exercises we start movements and what happens is those muscles aren’t engaging, they’re not contributing to the full lower body movement so instead of using our full lower body, using our core, hips, our knees, and everything all we’re using is our knees, our knees and that’s why knee injuries and ankle injuries are one big effect of the lack of hip strength. So why yoga is so effective for this is because instead of other exercises or other physical disciplines, where you are just going into the movement and it’s a quick movement like running or maybe it’s crossfade or whatever it is with yoga we’re slowing down the movements and sometimes we’re not even moving at all most of the most of the postures in yoga are static so we’re doing isometric exercises that number one build body awareness, they build muscular awareness so that you can feel those muscles turning on so that you can feels feel those muscles burning and gauging and number two, they also help to build strength so when you’re feeling that muscle activation, when you’re feeling those muscles turn on that also helps you build strength, so this is why yoga is so cool because we’re building again that muscle activation and building strength so.
So now I’m going to show you the best exercises for improving your hip strength, we’re going to target the various muscles of your hips that tend to get neglected while you are sitting during the day and these postures are great not for just athletes or people who are interested in performance but they’re also essential for anybody who wants to avoid injury, if you’re older and you want to make sure you don’t have back surgery or if you’re older and just want to make sure that you can still move or maybe you’re in your forty’s and you’re already encountering issues, these are the postures that all of us need. All right so the three exercises I’m going to show you today, number one is a standing march hold and by the way this is the intermediate lessons, so if you’re watching this now and you think you might need beginner head on back, if you want to progress to advance go through this lesson first and then head on over to advance if this is too easy.
So the first exercise is the standing march hold and that’s for your hip flexors. Number two is the runner’s lunge and this is for your inner thighs, your glutes, your hamstrings, pretty much your entire lower body. The final exercise is a chair pose and this is specifically focused on strengthening your glutes, which are which tend to be the laziest most inactive muscle in our lower body because of that whole sitting thing that I talked about. So let’s get into it first exercise is the standing march hold, so I’m going to have you find a wall just how about with balance because you don’t need to worry about balance, we’re going to work on your hip flexors, balance is second so for this let’s say the left hand is on the wall or whatever using for support and we’re going to balance on the left leg first. So I’m going to push down to my left foot, stand up nice and tall and then bring my right knee up toward the ceiling, you want to have it about hip level, the left leg is straight and my right heel is relaxed, so I want to isolate the hip flexor. Now from here I’m going to drive my right thigh into my right hand and push back with my right hand, so these two body parts the hand and the thigh are pressing into one another and that’s causing my hip flexor, the top outside of my right hip to turn on, so you can use the wall for support or if you’re finding that you’ve got good enough balance you can release your hand from that and work on pushing the top your head toward the ceiling as you’re driving your thigh into your hand and we’re holding this for thirty to sixty seconds. So as you’re doing this you want to feel that engagement or that burning muscle feeling in the top of the right hip, right here on the outside top of the hip, you’re also going to feel your abs engaged as you press your hands into press your hand into your thighs go ahead and release and that’s going to be sixty seconds, sorry thirty to sixty seconds, so work on building up the endurance, building up the strength to be able to do that. It is difficult especially if we’ve never worked specifically on our hip flexors before, let’s run through that one more time on the opposite side. So my right hand is on the wall, I’m going to work on lifting balancing on my right leg and then bringing my left knee up, now one of the thing I forgot to mention here you want to make sure that your hips are not uneven as you lift up, so instead of me lifting the knee way up like this or maybe not lifting the hip up enough, I want to make sure that my hips are somewhat level and now with the knee up, with the hips level I’m going to push my hand into my thigh, push the thought back into my hand, I’m relaxing the ankle so I don’t really care if this ankle active because when that leg extends, now my quadriceps is more active so I actually want to keep the ankle inactive so I can focus on my hip flexor and then pushing the hand to the thigh, driving down to the right foot, pushing your head up and you feel activation and again in the outside of the left hip and then in the abs as you push your hand into your thigh, use the wall for support or move your hand away from the wall when you’re secure in your balance. Go ahead and release, so that’s thirty to sixty seconds, work on that on your own, try I would go for two sets, start at thirty seconds and build your way up to sixty seconds total.
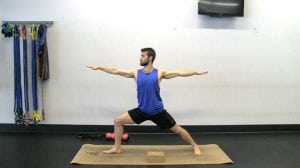
All right next exercise I’m going to show you is the runners lunge and this is an awesome pose, so universal it applies to so many different movements, it’s a foundational movement that all the should be able to do. So for the lunge, you’re going to have your knee over your ankle in your front foot, let’s go right leg forward first and I’m take a big step back with my left foot. Knee is over the ankle in the front foot, so I’m not going in the past the ankle and then I want to have my right glute, the right hip engaged, squeezing your legs toward one another, so this is another cool aspect of yoga, we’re focusing on the on the pulling and contrasting forces, so by that I mean squeezing the right heel back and squeezing the left knee forward and that’s going to turn on my inner thighs and engaging your inner thighs strengthening those muscles helps with knee stability so there’s injury prevention, it also helps with core engagement, which helps with reducing lower back pain or lower back discomfort in exercise. So my hands are on either side of the front foot, if you want to add a little bit more difficulty to this, you can lift your hands away from the ground, back legs straight, so notice that my knee isn’t sinking but I’m squeezing the back thigh, so both legs are working, I’m trying to keep the weight in my hips if you notice that you’re feeling this more in the knee, try to shift the weight in your hips, get your glute, get your inner thigh more active and we’re holding this one for thirty to sixty seconds, go ahead and stand up when you’re finished, that’s an awesome stretch and it’s actually not a stretch, that’s an awesome exercise, an awesome posture for building lower body and endurance and really strengthen your hips. Let’s do the opposite side once, so now I’ve got the left leg forward I’m going to take a big step back with my right foot. Knees over the ankle in the front foot, driving down through the left foot, so I’m pushing down through the toes to the ball mounds of my foot through the ball of my foot and then through the heel. I’m going to squeeze my legs toward one another so the right foot squeezes forward, the left heel squeezes back, hands or on either side of the front foot initially, so now my abs are tight, my inner thighs are engaged because my legs are pulling toward one another, my glute is turned on to my left leg so my outer and back my hip and I’ve also got my right leg engaged because I’m squeezing the right thigh to lift the knee. From here you can lift your hands away from the ground, try to make a straight line from your back heel to your head, squeeze your abs and again hold this for thirty to sixty seconds, go ahead stand up that’s the runners lunge. Very difficult but very effective, start at thirty seconds make your way up to sixty seconds and do two total of those for each side, so you can do thirty seconds twice on your right side and then thirty seconds twice on your left side and you’re going to do, you can also work your way up from thirty seconds to sixty seconds.
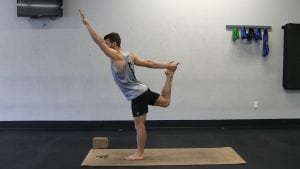
Next exercise final exercise, I’m going to show you today is called chair pose and this is for your glutes. So for this one you’re going to have your toes touching, you’re going to have your knees slightly bent forward, thighs squeezing toward one another, so I want you to pinch your upper thighs together, tighten your butt, tighten your glutes, and then push your butt out way behind you as much as you can and pretend like you’re sitting down into a chair. So you’re getting your butt way back, your knees are barely coming forward if at all notice that I can see if I look down, if you look down you should be able to see the whole top part of your foot, so don’t let the knees come forward like that, keep the knees back and keep squeezing the thighs toward one another so we’re building inner thigh stability, inner thigh strength and also squeezing your glutes, so that’s going to help with strengthening your glutes. Now you want to work on lifting the chest away from your thighs so maybe put your hands on top of your thighs and push your chest up, so stretching the front side of your body so this is all core and hips, you’re definitely going to feel the thighs but try to get the majority of the weight in your hips from here you can lift your arms up and this is a full chair pose. So this is amazing for building hip strength, for getting your glutes more active, it’s also great for countering a seated position, ironic that it’s called chair and we’re also building core strength. All right go ahead and stand up drive the hips forward as you stand up. So that’s chair pose, you can work on that one for thirty to sixty seconds again and I would do two total of those.
So you’ve got three exercise to practice hip strength right now. Number one, is that standing march hold, number two is the runners lunge and the number three we’ve got the chair pose. So these are all awesome for building the various strengths that your hips require, we’ve got inner thighs working, we’ve got the outer thighs and the glutes working, we have the hip flexors working, and we have the hands in the hamstrings and the quadriceps working, so those are the major muscles in your legs, we’ve got them all covered with that with those hip exercises.
So moving forward if you want to delve more into those hip hip exercises and work on the hip strength a little bit more, I have listed some helpful workouts below, so if you sign up for the members area it’s just one dollar that gets you access to view all of the workouts, all of the workout programs and tutorials and you can get straight into those workouts as soon as you sign up. So again those workouts are below, if you want to work into this a little bit more and continue to develop your hip strength, maybe learn a little bit more I talk about I talk like this in all of my lessons, so my goal is for you to learn as much as possible while you’re also doing the workouts and that means that as you’re doing this you start to you start to learn how to treat yourself, you start to learn what exactly your body needs and what exercises you should be doing in response to your body’s needs. So this is not just a workout, this is also an educational experience that you can use for the rest of your life so that’s what I try to do in my lessons just like I’m doing now this is exactly what I given all of my lesson. So if you’re interested in that again it’s one dollar, seven day free trial, sorry a one dollar, seven a trial gets you access to all of my content, the workout programs, tutorials, workouts and much more. So you can sign up manflowyoga.com/sevenday or just click that sign on a button right below here, otherwise we’ve got a lot of great more a lot of more great content coming you’ve got five lessons left in your free intro to Man Flow Yoga. Thanks for joining me today; I will see you tomorrow for the next lesson and that is hip mobility, I’ll see tomorrow.
Advanced
Hey guys, it’s Dean welcome to Man Flow Yoga, this is the lesson number three of your free of your free intro to Man Flow Yoga. This is hips, hip and glute strength, so I’m going to go through three things with you today actually four things. I’m going to tell you number one, why hip strength is so important, why you should care. Number two, talk about why most of us lack hips strength. Number three, give you my best postures for improving hip strength and the number four, give you a plan moving forward so that you can continue to work on your hip strength even after this free intro, this free intro lesson is done. So why do most of us, why do we care about hip strength? All of us should care about hip strength whether we’re athletes or just general fitness or just we want to be healthy. So hip strength is important because strong hips are the foundation of a strong lower body and if we don’t have strong hips, we’re at risk of injury in our knees, in our ankles, we could have back pain. So just a lot of bad stuff that comes from not having proper hip strength, so with more hip strength we have better lunges, we have better squats, actually we have a squat at all, we don’t have hip strength, we have a very poor squat and if you don’t have hip strength just in general fitness we could have back pain, we are more at risk for knee injuries. So hip pain is just the foundation of a strong lower body, now why don’t most of us have strong hips? And I’m saying that because most of us really do lack hips strength and that’s because we spend too much time being inactive, so in activity that is the number one cause of a lack of hip strength and that inactivity factor rolls over from when we’re sitting or when we’re standing and not being active and into our workouts and the reason for that is because when we move from sitting for four hours a day into our workout and we just start going, we start doing squats or we start doing lunges or we just start running, guess what? Those hips have not turned on yet, those hips are still in active, and those muscles are switched to off. So in order to get those muscles turn on we need to make sure that we are doing the proper muscle activation exercises that we’re building that muscular awareness and that we’re strengthening those muscles to counter that seated inactivity or even standing inactivity that we do during the day. This is why yoga is so awesome for this because yoga helps to directly address muscular awareness and helps to specifically build hip strength. So as we’re going through the exercises instead of having you moving quickly whether that’s running or doing repetitive squats, I’m going to have you hold the posture for a long time, a minimum of thirty, forty-five, sixty seconds and help you develop that muscular awareness and develop that specific hip muscle strength so that when you go into your other workouts you have that strength, those muscles are firing you have efficient movement, your whole lower body is working the way that it’s supposed to and you’re not just using your knees, which is what a lot of us tend to do again as a result of being inactive or just sitting.
So now let me show you the three best postures for working on your hip strength, before I move on I also want to say that I am a victim of a lack of hip strength, so when I was an athlete, I still am a athlete actually but when I played school, when I played lacrosse in high school, when I played soccer when I was younger, even when I played lacrosse in college, I had a knee and ankle issues and it wasn’t until I got out of college and really started diving into yoga that I understood that it was a lack of hip strength and not a lack of knees strength that was the real cause behind my knee, my ankle injuries. So if you can relate to that I hope this hope this establishes a chord with you and you’ll trust me and really learn from the stuff.
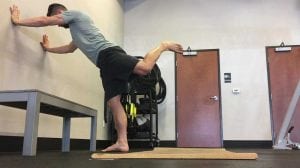
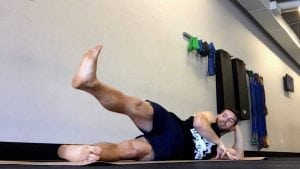
So now without further ado, let’s go into those exercises I’m going to show you three today. The first one is a standing march hold with leg extensions and this is the advanced version, so again this is advanced If you want to take it down a notch go to intermediate or maybe go to beginner and that’s fine, you can work our way up after that. The second exercise we’re doing is a high lunge and this works on hips again. Number three is the chair pose and I have actually got a special treat for you guys as the advanced users so let’s get into it. First exercise is the standing march hold and leg extension and this is one that kicked my butt the first time I did it so I’m hoping you will get something out of this too and you’ll really notice the hip activation going on. So I am going to have you start in a balancing position, let’s just balance on your left foot and bring your right knee up to hip level, this is the first part drive your hand into your thigh and push your thigh back into your hand. If you need to use your hand to balance on the wall that’s fine this is more about hip strength then it is about balance. Next part of this exercise keep this hip active so keep this knee driving up and then extend your leg forward so try to walk out your leg point your toes to the ceiling. Now if your leg doesn’t quite lock out, bring the leg a little bit lower, your goal here is to activate the hip flexors. So this is the top of the hip right here, and now to get more deep into this pose, to make this more difficult we want to drive the toe up toward the ceiling and really squeeze this muscle. If you want to get even higher bring your arms up you can lift your toes a little bit, the back of the standing leg stay straight here and you want to keep the shoulder over the hips so I’m not letting my hips go out in front of me, I’m not bending the knee, I’m staying straight through the standing leg. And this one you can hold for thirty seconds, maybe even build up to sixty seconds that’s the standing march hold. Let’s make sure to do the other side, I’ll do it straight on so you can see a different angle. So now balancing on my right foot, I’m going to bring the left knee up to hip level and drive my hand into my thigh, making sure that my right toes are pointed straight, forward press the top of the head toward the ceiling, so you’re getting tall to this position and then extend your leg forward, reach your toes toward the ceiling, try to lock out the leg again, if you can’t lock it out with your knee up this high, bring it down a little bit lower and then even bring your arms up. Keep this leg engaged the whole time so squeeze your thigh constantly throughout this exercise and again we’re going to hold this to thirty to sixty seconds, this helps not only develop hip strength but it also helps to relieve pressure from the knees. So the stronger you can get your hips the less pressure on the knees and that means less risk of knee injury, even less risk of ankle injury. Go ahead and release that it, that was tough. Again, that’s the standing march hold with leg extension that’s the advanced version. I would do that twice start at thirty seconds, keep good form, keep constant engagement through the legs and then build your way up to doing sixty seconds, so thirty seconds on the right, thirty seconds on the left, thirty seconds on the right, and then thirty seconds on the left, so that’s how you can practice that moving forward and you can do that every day, work your way up to sixty seconds as you progress.
Now second exercise come out of breath, this is difficult. The second exercise is a high lunge and so this is something that all this need you’re watching the advanced version of this, you’ve probably done a lunge before but I’m going to add some elements that might not be as familiar with you to make this very technique heavy and very muscle activation heavy. So start at the right foot forward, take a big step back with your left foot, knees over the ankle in the front foot, now squeeze your legs toward one another. My right foot squeezes back so I can feel my whole right thigh engage, my right glute engage, even the inside of the thigh engages and I’m going to squeeze the left knee, so lifting the left knee away from the ground, engaging the thigh and squeeze my left toes forward. So I’m creating the scissoring effect to engage my inner thighs, this is going to help with knee stability, again that knee injury prevention factor and also help with more core engagement. From here I want to reach my arms up all the way, straight up toward the ceiling, lift my ribs up away from my hips, reach my tailbone down. So notice that my back is an arch behind me shouldn’t have any pain in the back. I’m reaching my tailbone down so that my spine is still neutral, that’s also going to help me get a better stretch of the left hip. So I’m working on strengthen both legs, I’m also working on flexibility in my left hip flexor, arms are up and the more lift that we can get through the chest, the deeper the stretch in the more core engagement, we can hold this for sixty seconds and you can even work up to holding that for two minutes. So start at sixty seconds and then work your way up to two minutes. Let’s do the other side, just another review in technique, left foot forward, right one back, squeeze the legs toward one another, right foot squeezing forward, left heel squeezing back, notice knee is above the ankle, I’m not going forward if my knee goes forward that takes the weight out of my hip and puts that into my knee. Your goal with doing these exercises because this is hip strength is to focus on getting as much weight as possible in the knee and the only way that we can do that is by slowing it down and paying attention to the movement. So really zero in on the hips, really concentrate on establishing that mind, body, connection with the muscle building that muscular awareness and then as you move into your other movements, as you move into other exercises, different physical disciplines whatever it is, you’ll have that muscle activation, you’ll have more efficient muscle movement, more efficient movement you’ll be able to go for longer, you’ll have better endurance, just so many things come from all this muscle activation. All right, go ahead and release and again your goal there is start at sixty seconds, this is advanced and then move up to being able to do a full two minutes. I recommend doing this twice per day and maybe once at the beginning of the day, once at the end of the day, it’s also a wonderful way to warm up or you can do this before any workout or you can even do it at the end as a stretch.
All right next and final exercise is the chair pose, but again I’m going to add in a little bonus here since this is the advanced version. So chair pose is all about glute engagement we’re focusing on toes touch, heels about an inch apart, I’m going to let my knees come forward just slightly and then I want to zipper my legs together, so I’m really squeezing my interest thighs together, my thighs or my glute squeezed together, so like I’m pinching a penny between my butt cheeks and then I’m going to get my butt back and sit back, knees still squeezing toward one another, upper thighs still squeezing together. Now from here bring your arms up and hold this to make this more intense to make this more difficult you can sit down lower but make sure that the weight doesn’t go forward so as you sit down this is the exact opposite of what you want to do right now right, so when I look like this, this is bad, I want to get the weight back to the point where I feel like I’m falling over and that’s what’s going to put the weight on your hips. So this is a chair pose, now adding a little element of difficult to this, we’re going to lift one leg, we’re going to make this a single leg chair pose, difficulty here is going to be in keeping the hips squared, so as you lift the leg, don’t let the hip turn out. So keep really pinching the right hip in as you hover the left foot, maybe even sit lower to challenge yourself, maybe get ten seconds, fifteen challenge yourself, maybe even thirty and then switch sides. Again you want to keep the hips squeezing in the tendency is for the hips to turn out to the outside or to the inside, so we want to keep the hips squeezing in and that’s going to keep the glute engaged, that’s what’s going to really help you build glute strength, which is probably the most important muscle in your hips, the more glute strength you have, the better running you have, better jumps, better lunges. All right point that foot sit down a little bit lower, hold this a little bit longer, now that you’ve done both legs, you’ve got lots of nice burning going on the thighs, and stand up all the way.
All right those are your three exercises, that last one was the chair and the single leg chair I would start it thirty seconds, work on the depth, work on getting the weight in your hips into your glutes and work your way up to even ninety seconds with that. So that’s a wonderful one do as part of the workout, it’s very good for muscle activation, so you can do it before a workout, you can do it during a workout or probably not at the end of the workout and really make sense but you can do it as a stand alone workout if you need to break up the day, if you’ve been sitting a lot and you want to get those glutes active, it’s wonderful for that.
All right if you want to delve more into these exercises, I’ve included a list of some my favorite hip strength exercises from the members area below here. So to access those just sign up for the seven day trial, it’s just one dollar and then click on those links below and you’ll be able to view those workouts immediately. Again these are some my favorite workouts from the members area and they’re specific specifically focused on helping you build more hip strength, again hip strength this is the foundation of a strong injury resistant lower body, so you need to work on your hip strength whether you’re an athlete or if you’re just general fitness, you just want to be healthier. I’m out of breath sorry these exercises are difficult even for me and I hope you enjoyed the presentation. I hope you’re getting a lot out of the lessons so far. I try to bring this much energy, this much instruction to all of my workouts, so you notice that as I’m talking through the postures and telling you what to do, what to feel but I’m also telling you how they relate to your fitness because in addition to just giving you a good workout, I want to give you knowledge, I want you to understand why you’re doing all these postures how they affect your body, why they’re important for your fitness and as you learn that, as you internalize it and you start to build the association between the exercise and how it feels in your body, you’ll be able to know exactly what you need to do in certain situations. So if your lower back is sore in a particular way, you’ll know I need to do this exercise and that will make my lower back feel better or if you’re about to do a workout and you’re feeling like your glutes quite aren’t firing you know that you should do a chair pose, right so as we’re doing these workouts learn, try to get information from everything that I’m talking about and start to internalize it so that you’re not just getting a workout but you’re getting knowledge for life to help you maintain your fitness, maintain longevity and have fun while doing it.
So thanks for joining me for the second lesson, if you’re ready to jump into the member’s area it’s just one dollar, just one book gets you seven days of access, unlimited access to the content, the workout programs, tutorials, and so much more. You can sign up just by clicking the link below there’s a button that probably says something like sign up and if not I’m excited to see you for day three of your free intro to Man Flow Yoga, the next lesson is hip mobility. I’ll see you then.
Recommended Workouts
Part of the Man Flow Yoga Members’ Area.
 Hip Strength Essentials
 Hip Strength Essentials Flow
 Muscle Activation 1
 Muscle Activation 2
 All-Standing Activation
 Balance, Squats, and Core
 HIP FLEXORS
 Haka Side Lunge & Mobility
 Haka Circles
 Advanced Hip Flexor Workout
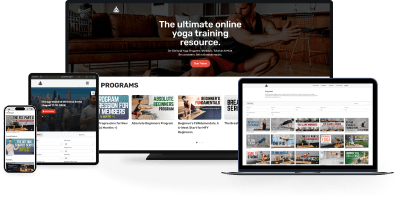
Ready to get started?
Access hundreds of workouts, tutorials, and the Man Flow Yoga community