Day 3 – Hip Mobility
Your body is one, big interconnected unit
This video is for all levels
Hey guys its Dean, welcome to your free intro to Man Flow Yoga today is lesson number three, hip mobility. So we’re going to be working on the mobility from here from your thighs up toward your ribs, now that mobility is important because it affects way more than just your hips. Let’s agree that hip mobility is not a sexy term but it’s very important for the way that your body functions, so your hips affect your knees, they affect your spine and without hip mobility we’re at a greater risk of knee injury, our back is going to hurt more and we can even have ankle and shoulder injuries as a result of lack of hip mobility. So today I’m going to talk about why hip mobility is so important, I’m going to show you my favorite postures for working on hip mobility even though there’s a ton, I got to pick just three to keep this lesson short and to give you a plan moving forward so that you can continue to work on your hip mobility even after this lesson is finished. So first off why is hip mobility important? Hip mobility is important because as I mentioned before it affects more than just your hips. How your hips function also has an effect on your knees, your ankles your, spine, and even your shoulders, without hip mobility you won’t be able to pivot quickly, you won’t be able to jump as high, you won’t be able to recover as quickly and just in terms of every day fitness you’re going to avoid things like just bending over to pick something off the ground or bending over and doing a forward fold like this, not to mention all of those all those other athletic movements that I talked about before this so hip mobility is something that everybody needs and if you have a lack of mobility, eventually you will notice it in the form of either need pain back pain or any of those other pains that I talked about.
So let’s get into the exercises, I’ve got three for you today, I’m going to show you all of these at once and these are all the same difficulty, so I’m going to show you how to progress but it’s all going to be one video, so no beginner, intermediate, advanced video in this particular section. The three videos that I’ve got for you are the three exercises that I’ve got for you are the lizard, which is a variation of a lunge, we’ve got pigeon which is all about your outer hips and your glutes very important and then we’ve got triangle which is for your inner thighs and these are all specific to yoga.
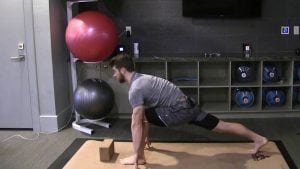
So let’s get started first one is the lizard and for this I’m going to have you use a block or if you have a chair that would also work wonderfully. So for the lizard I’m going to have you bring your right foot up just like you’re doing a lunge right so we did the lunge on on day on day two, yesterday so we’ve got the knee over the ankle in the front foot and we’ve got the chest lifting up, we’ve got the back knee slightly behind the hip, now from here I’m going to walk my right foot forward a little bit and then take it to the outside, so it’s a little deeper than a lunge. Block is inside your front foot or to bring the hands on top of the block or if you have that chair you can also put a chair here and that will work as well. The goal from here is to work on lifting your chest up as much as possible and even starting to point your sternum up at the ceiling as you’re doing this we want to add a mobility factor to this is well, so we’re not just passively stretching or making it active so squeeze your right heel back, squeeze your left knee forward and push down to your foot while lifting the chest up actively. This is going to add more of a stretch to the front of the left hip. You might also get something on the inner I thought I and this is going to make you better able to control your body within extended range of motion, so this is variation number one using the chair. Variation number two would be going to a block and pressing the hips forward even more. Variation three, is moving all the way down to your forearms and you can see I’m not quite tight enough yet, I’m not quite warmed up enough yet to get my forms down to the ground but it’s really not important because as long as you’re feeling the stretch here and you’re working on pressing the hips forward and keeping your chest up you’re getting the benefit of the lizard. Benefit of the lizard write that down that sounds funny.
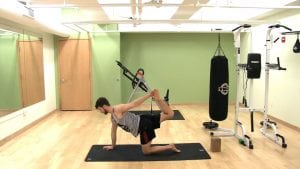
All right next stretch is pigeon and so I’m going to show you level one because this is really difficult especially if you haven’t done it before and it could end up hurting your knees if you do it incorrectly, so pay attention. First one is a reclining pigeon and doing this on your back and I want you to find a wall for this. So when I have you lay down about two feet away from the wall, you’re going to place both feet on the wall, recline on your back bring your arms straight out to the side and then cross your right leg over your left leg and make a triangle with your legs. Your goal here is to open up the outer hip so I’m not just pushing the knee forward, I’m actually externally rotating my right thigh, so that the inner thigh faces me and the outer thigh faces away from me. From here if you’ve got the wall you can just lightly push your left foot into the wall, while extremely rotating the right hip and you’re going to get a really nice stretch on the outer hip, if you don’t have a wall that’s totally fine just grab the back of the left thigh and lightly pull that toward your chest you can keep your head relaxed on the ground for this one and this is the reclined pigeon or the reclined figure four, so named because your legs make a four in this position. So this is version one if you’re feeling a great stretch here do that on both sides. If you’re not feeling a great stretch you want to go a little bit deeper here is variation two, so we’re going to have you start in a tabletop position for this one and then slide your right knee up toward your right hand, bring your right foot across your body and then crawl your left leg straight back. Your goal here is again to get the inner right thigh to face straight up, the outer right thigh to face down and you want to have your hips in the middle so if you look back and you notice that your hips are kind of over to the right, oh sorry, over to the left which is what people tend to do when they’re first doing this try to bring your hips over to the right a little bit and get that right hip sinking toward the ground. Now instead of folding forward like this, which is what I see a lot of people doing I want you to work on lifting your ribs up away from your hips so creating more space in your hips, creating space in your ribs and getting a better stretch through the outer hip or through the glutes, your hands can come out in front of you to help lift up and we’re going to stay in this position now being active in this position because I mentioned before we want to have control with an extended range of motion, squeeze your right knee toward your left knee and that will add a little bit of muscle engagement and even let you go deeper into this posture. So this is pigeon and this is the level two.
Level three we’re going to we’re going to move all the weight out of the upper body and into the hips, so for this place your hands lightly on top of your right leg, allow your hips to sink even deeper, keep pulling the ribs up and maintain this position here, this is more intense but it will get a deeper stretch and if you’re ready for it and got good technique this should feel fine on your hips. All right so there are there’s the variations the pigeon.
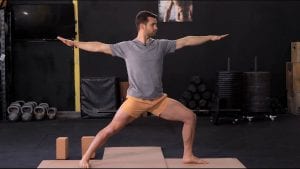
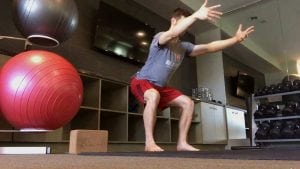
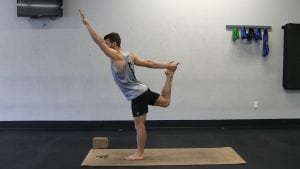
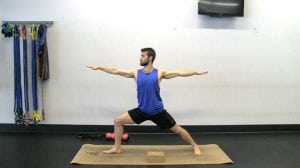
Now the last I’m going to do is a triangle and this is for your inner thighs, so triangle is great because it counters what we’re doing during the day, it also stretches a muscle that we don’t tend to stretch even if we do do some rudimentary stretching. So for this one we’re going to start in a wide legged position, I’m going to have you turn your right foot out, facing straight out, bend into your right knee keep your hips facing out to the side place a block inside your right ankle and then from here I want you to press your right hip into your left hip and start to straighten your right leg now you don’t have to lock out the right leg at all, just straighten that leg and to feel a stretch in the inner thigh and then roll back your left shoulder, so it’s almost like you’re being smushed between two walls you want to make your body as thin as possible and then extend your left arm up so to get better form here usually you need to bring your hips forward in a direction that they’re facing so in this case I’m bringing my hips toward you and my chest comes away from you so my chest comes back a little bit. So I’ve got this stretch on my inner thigh and I’ve got to stretch on the outer hip, my left arm extended up and I’m using the block to support myself this. Level is one, you can also use a higher object or bend your knee more if you’re feeling like that stretches too intense.
Now level two we’re going to move the block away and you’re just going to press the hand into the back of the ankle and extend the left arm up so this is level two, unassisted and we’re going to hold this for about thirty seconds maybe up to forty-five seconds and then go ahead and come out of that and switch sides do the other side. So let’s recap, those three poses, we’ve got the lizard that when you’re going to hold for a minimum of sixty seconds, this is a very good stretch to do at the beginning and the end of the day, because especially if you’re going to be an active most of us aren’t lunging for work so it’s really great to do this before work to get your hips nice and open and then afterwards because your hips are probably been tightened and closed off during the day. So lizard, sixty seconds twice per day. Number two is the pigeon, so we’ve got the version where you can do on your back, right so just to recap that we can cross the leg over the ankle here, grab the back of the thigh, lightly open the right hip to externally rotate and we can hold this one for thirty seconds minimum forty-five maybe even sixty seconds. And then we’ve got a pigeon as well so pigeon is from the table top position, sliding your hand toward your knee, bringing the foot across the body and then crawling your left foot back and getting into it slowly, don’t get into it quickly like I just did and so this when we’re going to hold for a minimum of forty-five seconds, you can probably hold this up to ninety seconds and this is one I would do at least once per day probably at the end of the day as it’s a really nice restorative pose, helps to relieve tension in your hips It also helps you sleep better so all you can also do this at the end of your workout and again you’re going to hold this one for forty-five to ninety seconds on both sides. The last we’ve got is that triangle exercise, so from a wide legged position, one foot turns out, knees slightly bent back up, the front hip pushes into the back, fingers inside the ankle, left arm is up or using the block here to help bring the ground up a little bit higher, help you keep better form, help you get a good stretch even if you don’t have the mobility to straighten the leg quite yet and not when you’re going to do for thirty to forty-five seconds once per day and that’s one that I would do after a little bit of warmup, so maybe if you’ve already done some squats, done some lunges, or if you’ve gone for a run or maybe you’re finishing up with a weightlifting session that’s a great one to do after your workout. So those are my three hip stretches for you today, if you want to delve into this a little bit more and learn more about hip mobility, I’ve selected three of my favorite workouts from the Man Flow Yoga workout library that have to do with hip mobility and I’ve put the links below here. So if you want to check those out sign up for the seven day trial it’s just one dollar and they’ll get access to all of those workouts and you’ll be able to go in try them out and work on your mobility a little bit more. Otherwise one thing I want you to take away from this lesson today is the interconnectedness of your body, so we talked about at the beginning how hip mobility affects more than just your hips, having mobility in your in your hips, helps make your knees, your ankles, your spine, and even your shoulders, less resistant to injury so when we think about an injury to the knee right maybe it’s actually not caused by knee by the knee mostly it’s actually caused by the hip, so start thinking about your body as a single interconnected unit and you’ll be able to work on your fitness much better and address weaknesses and address older recurring injuries much more effectively if you understand this concept of interconnectedness in your body.
Again we’ve got the one dollar trial for seven days of access seven days of access to the members area so if you want to get started jump into the program that is there there’s a sign up now button below here click that, fill out the form and you’ll be looking at the workouts and all of our workout programs tutorials, in just minutes. All right guys thanks for joining me for the lesson today I look forward to seeing you tomorrow for the next one and tomorrow’s lesson is spine.
Recommended Workouts
Part of the Man Flow Yoga Members’ Area.
 Yoga Sharpen (Guyoga)
 Building Up to High Lunge
 Building Up to Squat
 HIP FLEXORS
 50 Minute Hip Flexibility
 Hip, Hamstring, & Adductor Flexibility
 Haka Side Lunge & Mobility
 Haka Circles
 Advanced Hip Flexor Workout
Ready to get started?
Access hundreds of workouts, tutorials, and the Man Flow Yoga community